
Today in this article you will know how to create Image Comparison Slider with HTML CSS and JavaScript. I have created many types of image sliders before but now time to create Image Comparison Slider using javascript.
If you want, you can use HTML CSS Image Comparison Slider in any of your projects like ecommerce website, product website. Here I have given all code and explanation which will help you a lot.
- Project Live Preview
- HTML Code
- CSS Code for Styling
- JavaScript Code
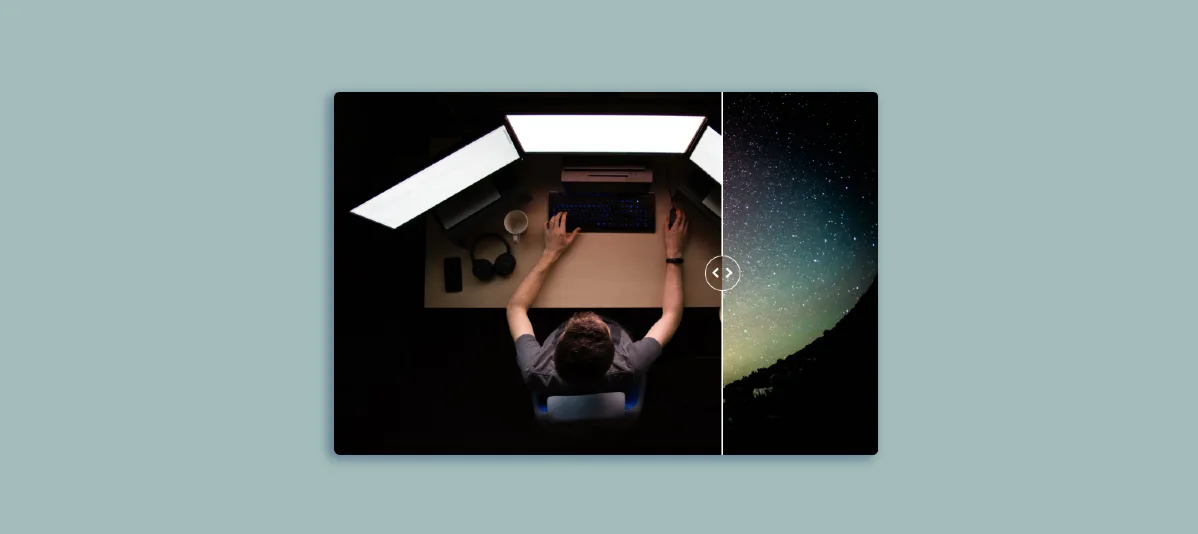
Image Comparison Slider in HTML CSS and Javascript
An Image Comparison Slider is a user interface component created using HTML, CSS, and JavaScript that allows users to interactively compare two images by adjusting a slider.
This interactive element is particularly useful for showcasing before-and-after images, visualizing changes in design, or highlighting differences in images.
The slider enables users to reveal or hide parts of one image to see how it compares to another.
See the Pen Image Comparison Slider by Coding Journey (@Coding_Journey) on CodePen.
In this Image Comparison Slider I have added 3D effect which further improves its design.
Step 1: Structure of Image Comparison Slider
Now we need to use some HTML to create this HTML Image Comparison Slider.
Typically, the HTML structure involves an outer container div that holds two images and a slider element. Each image represents a different version, and the slider is the interactive element.
<!-- Container for the image comparison slider -->
<div id="image-comparison-slider">

  <!-- Before image -->
  <img src="https://www.dropbox.com/s/h8rds5ozk0u3s2f/coder.jpg?raw=1" alt="before">

  <!-- Wrapper for the after image with the slider effect -->
  <div class="img-wrapper">
    <img src="https://www.dropbox.com/s/pem8kaorr488apn/universe.jpg?raw=1" alt="after">
  </div>

  <!-- Labels for before and after images -->
  <span class="label label-before">Before</span>
  <span class="label label-after">After</span>

  <!-- Handle for the slider with lines and circles -->
  <div class="handle">

    <!-- Top handle line -->
    <div class="handle-line"></div>

    <!-- Circle handle containing left and right chevron icons -->
    <div class="handle-circle">
      <i class="fas fa-chevron-left"></i> <!-- Left chevron icon -->
      <i class="fas fa-chevron-right"></i> <!-- Right chevron icon -->
    </div>

    <!-- Bottom handle line -->
    <div class="handle-line"></div>
  </div>
</div>
Step 2: Design the Image Comparison Slider
If you want to design this Image Comparison Slider then use CSS.
CSS is used to style the container, images, and slider to create an appealing visual presentation. The container is set to a relative position, and the images are displayed side by side. The slider is styled as a draggable element.
/* Reset default styles for all elements */
* {
  margin: 0;
  padding: 0;
  box-sizing: border-box;
}

/* Define CSS variables */
:root {
  --image-comparison-slider-width: min(80vw, 768px);
  --image-comparison-slider-handle-width: 50px;
}

/* Set global styles for the body */
body {
  font-family: Helvetica, sans-serif;
  width: 100%;
  min-height: 100vh;
  display: flex;
  align-items: center;
  justify-content: center;
}

/* Styles for the image comparison slider container */
#image-comparison-slider {
  position: relative;
  width: var(--image-comparison-slider-width);
  overflow: hidden;
  border-radius: 0.5rem;
  box-shadow: -7px 5px 16px 1px rgba(56, 86, 122, 0.6);
  cursor: col-resize;
}

/* Styles for images within the slider */
#image-comparison-slider img {
  display: block;
  width: var(--image-comparison-slider-width);
  height: auto;
  max-height: 80vh;
  object-fit: cover;
  pointer-events: none;
  user-select: none;
}

/* Styles for the wrapper of the after image */
#image-comparison-slider .img-wrapper {
  position: absolute;
  top: 0;
  right: 0;
  width: 50%;
  height: 100%;
  overflow: hidden;
  z-index: 1;
  transform: translateZ(0); /* Fix for Firefox bug related to the 3D tilt effect */
}

/* Styles for the after image within the wrapper */
#image-comparison-slider .img-wrapper img {
  position: absolute;
  top: 0;
  right: 0;
  height: 100%;
}

/* Styles for labels (Before and After) */
#image-comparison-slider .label {
  position: absolute;
  top: 1rem;
  z-index: 3;
  color: #fff;
  background-color: rgba(0, 0, 0, 0.33);
  border-radius: 0.25rem;
  padding: 0.5rem 0.75rem;
  font-size: 0.85rem;
  text-align: center;
  letter-spacing: 1px;
  user-select: none;
  opacity: 0;
  transition: 0.25s cubic-bezier(.68,.26,.58,1.22);
}

/* Show labels on hover */
#image-comparison-slider:hover .label {
  opacity: 1;
}

/* Styles for 'Before' label */
#image-comparison-slider .label.label-before {
  left: 1rem;
}

/* Styles for 'After' label */
#image-comparison-slider .label.label-after {
  right: 1rem;
  background-color: #f95540;
}

/* Styles for the handle (slider control) */
#image-comparison-slider .handle {
  position: absolute;
  top: 0;
  left: calc(50% - var(--image-comparison-slider-handle-width)/2);
  width: var(--image-comparison-slider-handle-width);
  height: 100%;
  display: flex;
  flex-direction: column;
  justify-content: center;
  align-items: center;
  user-select: none;
  z-index: 2;
}

/* Styles for the lines within the handle */
#image-comparison-slider .handle-line {
  width: 2px;
  flex-grow: 1;
  background-color: #fff;
}

/* Styles for the circle within the handle containing chevron icons */
#image-comparison-slider .handle-circle {
  width: var(--image-comparison-slider-handle-width);
  height: var(--image-comparison-slider-handle-width);
  color: #fff;
  border: 2px solid #fff;
  border-radius: 50%;
  display: flex;
  align-items: center;
  justify-content: space-evenly;
}

/* Media query for responsiveness on smaller screens */
@media (max-width: 768px) {
  :root {
    --image-comparison-slider-width: 90vw;
  }
}
Step 3: Image Comparison Slider JavaScript
JavaScript is used to add interactivity to the slider. Event listeners are employed to track mouse movements, and the width of the ‘before’ image is updated accordingly. This creates the effect of revealing or hiding portions of the images as the user interacts with the slider.
// Initialize VanillaTilt on the image comparison slider
VanillaTilt.init(document.querySelector("#image-comparison-slider"), {
    max: 5,           // Maximum tilt angle
    speed: 800,       // Tilt transition speed
    scale: 1.02       // Transform scale - 2 = 200%, 1.5 = 150%, etc.
});

// Get references to necessary elements
const slider = document.querySelector("#image-comparison-slider");
const sliderImgWrapper = document.querySelector("#image-comparison-slider .img-wrapper");
const sliderHandle = document.querySelector("#image-comparison-slider .handle");

// Add event listeners for mouse and touchmove events on the slider
slider.addEventListener("mousemove", sliderMouseMove);
slider.addEventListener("touchmove", sliderMouseMove);

// Function to handle slider mouse movement
function sliderMouseMove(event) {
    // Check if the slider is locked
    if (isSliderLocked) return;

    // Get slider dimensions and mouse position
    const sliderLeftX = slider.offsetLeft;
    const sliderWidth = slider.clientWidth;
    const sliderHandleWidth = sliderHandle.clientWidth;
    let mouseX = (event.clientX || event.touches[0].clientX) - sliderLeftX;

    // Ensure mouseX stays within the slider boundaries
    if (mouseX < 0) mouseX = 0;
    else if (mouseX > sliderWidth) mouseX = sliderWidth;

    // Adjust the width of the image wrapper and position of the slider handle
    sliderImgWrapper.style.width = `${((1 - mouseX / sliderWidth) * 100).toFixed(4)}%`;
    sliderHandle.style.left = `calc(${((mouseX / sliderWidth) * 100).toFixed(4)}% - ${sliderHandleWidth / 2}px)`;
}

// Initialize a variable to track whether the slider is locked
let isSliderLocked = false;

// Add event listeners for mousedown, touchstart, mouseup, touchend, and mouseleave events on the slider
slider.addEventListener("mousedown", sliderMouseDown);
slider.addEventListener("touchstart", sliderMouseDown);
slider.addEventListener("mouseup", sliderMouseUp);
slider.addEventListener("touchend", sliderMouseUp);
slider.addEventListener("mouseleave", sliderMouseLeave);

// Function to handle slider mousedown event
function sliderMouseDown(event) {
    // If the slider is locked, unlock it and handle the mouse movement
    if (isSliderLocked) isSliderLocked = false;
    sliderMouseMove(event);
}

// Function to handle slider mouseup event
function sliderMouseUp() {
    // If the slider is not locked, lock it
    if (!isSliderLocked) isSliderLocked = true;
}

// Function to handle slider mouseleave event
function sliderMouseLeave() {
    // If the slider is locked, unlock it
    if (isSliderLocked) isSliderLocked = false;
}
With just a few lines of HTML, CSS, and JavaScript, you can create a sleek and interactive image comparison slider.
An Image Comparison Slider is a dynamic and engaging way to present visual changes on a webpage. It offers users a hands-on experience to explore and compare different versions of images in real-time.
Comment how you like this project (Image Comparison Slider using HTML, CSS and Javascript). If you want the source code of this Image Comparison Slider then use the button below.
Comparing two images in JavaScript can involve various techniques depending on your specific requirements. This method involves iterating through each pixel in both images and comparing their RGB values.
function compareImages(img1, img2) {
// Assuming both images are of the same size
for (let i = 0; i < img1.data.length; i += 4) {
// Compare RGB values of each pixel
if (
img1.data[i] !== img2.data[i] ||
img1.data[i + 1] !== img2.data[i + 1] ||
img1.data[i + 2] !== img2.data[i + 2]
) {
return false; // Images are different
}
}
return true; // Images are identical
}