
In this article you will know how to create Confetti Button Effect with html, css and javascript. You can use this Confetti On Button Click effect on any button of your project. This effect will greatly enhance the user experience of your website.
If you know basic javascript then you can create this confetti animation very easily.
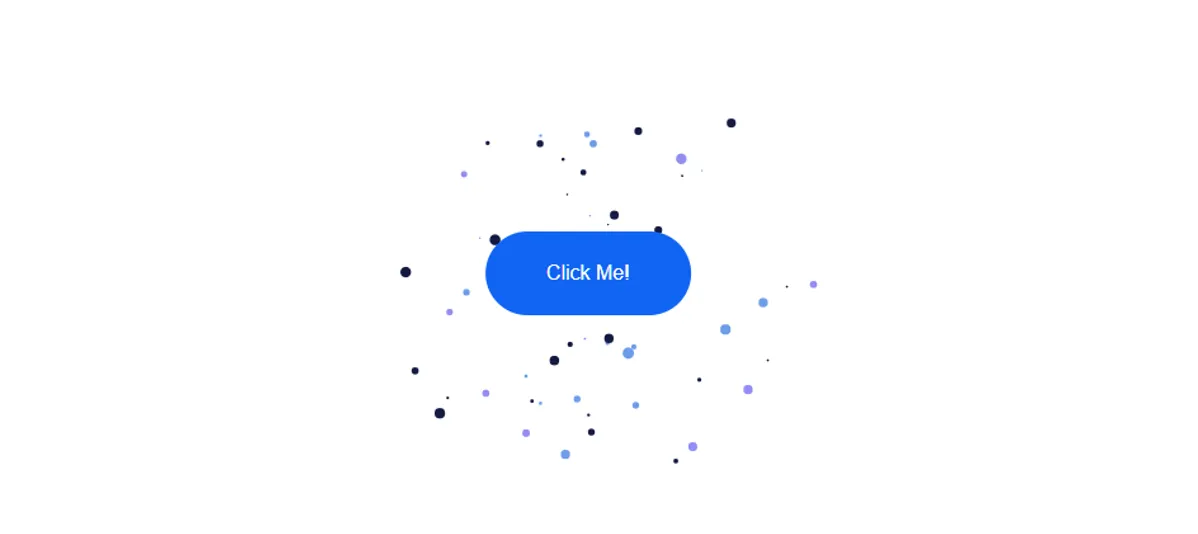
Javascript on Click Confetti Effect
Want to make your website more attractive? One popular way to achieve this is by adding confetti animations to button clicks.
The playful and visually appealing nature of confetti can bring a touch of celebration to various web applications. In this article, we’ll explore how to implement a confetti effect triggered by a button click using JavaScript.
See the Pen Untitled by Growthpanda (@Growthpanda) on CodePen.
Hopefully from the above demo you have learned how this JavaScript Confetti Explosion Effect works. Here first I have created a simple button using html and css. Then I added the Confetti effect by JavaScript.
Confetti Button Effect with HTML CSS JavaScript
Now time to know step by step how to make Confetti On Button Click. Here I have shared step by step tutorial for beginners. If you just want the source code then you can use the download button below.
First I created the button using html. Then I designed the button by CSS. Finally, I activated the Confetti effect with JavaScript.
Step 1: Confetti Button Effect HTML Code
To get started, create a simple HTML structure that includes a button element and a container for the confetti. Here I have created a simple button using button tag.
<div class="container">
      <canvas id="canvas">Canvas is not supported in your browser</canvas>
</div>
<button id="display-confetti">Click Me!</button>
Step 2: Design buttons with CSS
Define the styles in a separate CSS file (styles.css) to position the button and confetti container. Confetti On Button Click does not require CSS. Here only CSS is used to design the button.
body {
  overflow: hidden;
}
canvas {
  background-color: #ffffff;
}
button {
  font-size: 1em;
  position: absolute;
  background-color: #1164f4;
  color: #ffffff;
  border: none;
  transform: translate(-50%, -50%);
  left: 50%;
  top: 50%;
  padding: 1.5em 3em;
  border-radius: 3em;
  cursor: pointer;
  font-family: "Poppins", sans-serif;
}
Step 3: Enable Confetti Animation with Javascript
Now, let’s add the confetti animation logic in a JavaScript file.
let canvas = document.getElementById("canvas");
let context = canvas.getContext("2d");
let width = window.innerWidth;
let height = window.innerHeight;
//This section retrieves the canvas element from the HTML document, gets its 2D rendering context
let clicked = false;
//The code establishes a button reference and a boolean variable, clicked, to track whether the button has been clicked or not.
let displayButton = document.getElementById("display-confetti");
let particles = [];
let colors = ["#141b41", "306bac", "#6f9ceb", "#98b9f2", "#918ef4"];

//Events object
let events = {
  mouse: {
    down: "mousedown",
    move: "mousemove",
    up: "mouseup",
  },
  touch: {
    down: "touchstart",
    move: "touchmovve",
    up: "touchend",
  },
}; //This section defines object events with properties for mouse and touch events. This is used to handle both mouse and touch events consistently.

let deviceType = "";
//Detect touch device
const isTouchDevice = () => {
  try {
    document.createEvent("TouchEvent");
    deviceType = "touch";
    return true;
  } catch (e) {
    deviceType = "mouse";
    return false;
  }
}; //The isTouchDevice function attempts to create a TouchEvent and determines whether the device supports touch input. It sets the deviceType accordingly.


//For using request animationFrame on all browsers
window.requestAnimationFrame =
  window.requestAnimationFrame ||
  window.webkitRequestAnimationFrame ||
  window.mozRequesetAnimationFrame ||
  window.oRequestAnimationFrame ||
  window.msRequestAnimationFrame ||
  function (callback) {
    window.setTimeout(callback, 1000 / 60);
  }; //This code ensures compatibility with various browsers by providing a fallback for the requestAnimationFrame function.


//Random number between range
function randomNumberGenerator(min, max) {
  return Math.random() * (max - min) + min;
}

//These functions handle the confetti animation logic. The startConfetti function is the main animation loop, creating and updating particles.
function startConfetti() {
  let current = [];
  context.fillStyle = "rgba(255,255,255,1)";
  context.fillRect(0, 0, width, height);
  if (clicked) {
    createConfetti();
  }
  for (let i in particles) {
    particles[i].draw();
    if (particles[i].move()) {
      current.push(particles[i]);
    }
  }

  particles = current;
  window.requestAnimationFrame(startConfetti);
}

function createConfetti() {
  //Increase range for bigger confetti;
  let numberOfParticles = randomNumberGenerator(10, 20);
  let color = colors[Math.floor(randomNumberGenerator(0, colors.length))];
  for (let i = 0; i < numberOfParticles; i++) {
    let particle = new Particle();
    particle.color = color;
    particles.push(particle);
  } // The createConfetti function generates a specified number of confetti particles with random colors.
}

function Particle() {
  let buttonBounds = displayButton.getBoundingClientRect();
  this.width = randomNumberGenerator(0.1, 0.9) * 5;
  this.height = randomNumberGenerator(0.1, 0.9) * 5;
  this.x = buttonBounds.x + buttonBounds.width / 2;
  this.y = buttonBounds.y + buttonBounds.height / 2;
  let angle = Math.random() * Math.PI * 2;
  let speed = randomNumberGenerator(1, 5);
  this.vx = Math.cos(angle) * speed;
  this.vy = Math.sin(angle) * speed;
} //The Particle constructor creates individual confetti particles.

Particle.prototype = {
  move: function () {
    if (this.x >= canvas.width || this.y >= canvas.height) {
      return false;
    }
    return true;
  },
  draw: function () {
    this.x += this.vx;
    this.y += this.vy;
    context.save();
    context.beginPath();
    context.translate(this.x, this.y);
    context.arc(0, 0, this.width, 0, Math.PI * 2);
    context.fillStyle = this.color;
    context.closePath();
    context.fill();
    context.restore();
  },
};

isTouchDevice();
displayButton.addEventListener(events[deviceType].down, function (e) {
  e.preventDefault();
  clicked = true;
}); //The code checks the device type and sets up event listeners for the button click or touch events. The window.onload event triggers the start of the confetti animation when the page is fully loaded.

displayButton.addEventListener(events[deviceType].up, function (e) {
  e.preventDefault();
  clicked = false;
});

window.onload = () => {
  canvas.width = width;
  canvas.height = height;
  window.requestAnimationFrame(startConfetti);
};
By following these steps, you can easily add a delightful confetti animation to button clicks on your website, creating a more engaging and enjoyable user experience.
Comment how you like this CSS Confetti Button Effect. If you want the source code then use the download button below.