
In this article, you will learn how to create an Image Color Picker using HTML CSS and Javascript. Earlier I shared with you tutorials on many types of projects using JavaScript.
If you know the basics of JavaScript, then you can easily create this JavaScript Color Picker. Here I have given you the source code and step-by-step information on this JavaScript Image Color Picker. A live preview is also provided so that you can know how this Image Color Picker works. Here I have used some basic HTML to create the structure. Used CSS to design and implemented it using JavaScript.
JavaScript Image Color Picker
Earlier I shared with you the tutorial on different types of gradient color generators, custom color generators, automatic color generators, etc projects. I made this Image Color Picker using HTML CSS and javascript.
This type of JavaScript can be found in Color Picker professional image or video editing tools. With the help of this project, you can select any color and know its color code.
If there is any difficulty in using this Color Picker HTML CSS in your project then you can comment to me. Here is every javascript code I have explained step by step which will help you to easily know how to create HTML Image Color Picker.

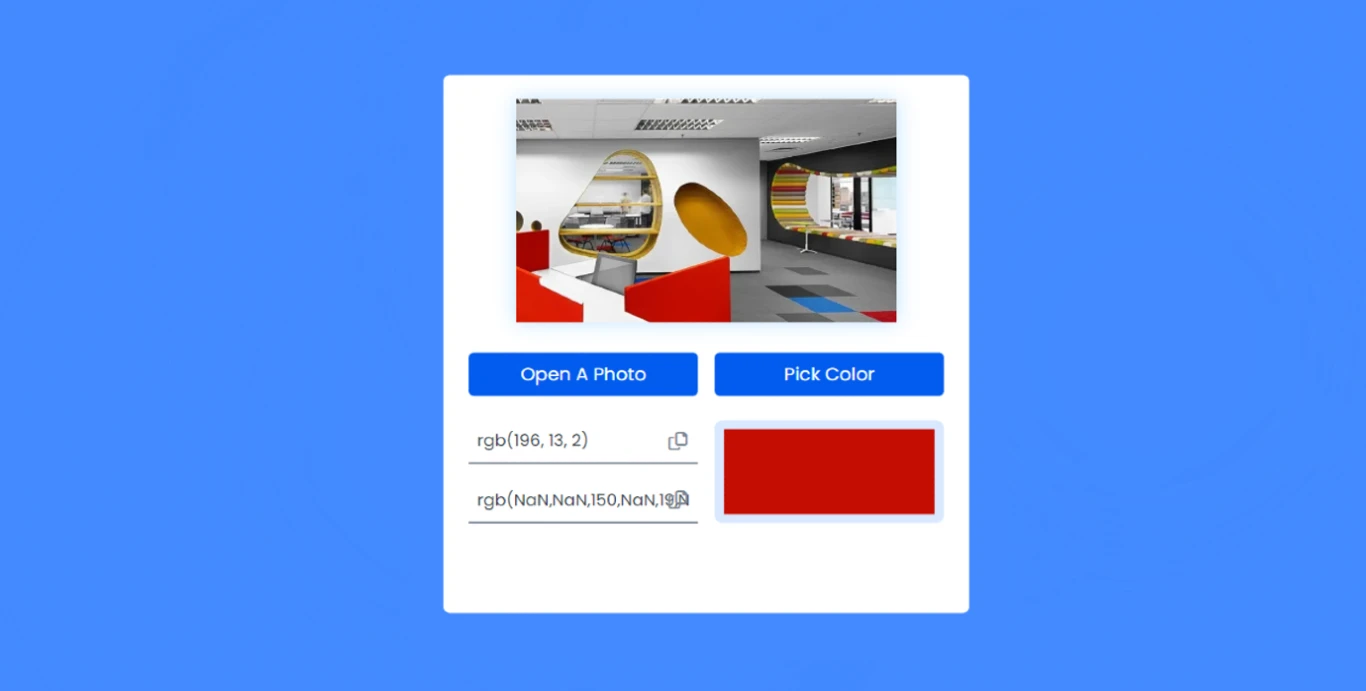
As you can see from the preview button above, this is a simple Image Color Picker that I created with html css and javascript.
First I created a box on the webpage which has a small display first. In that display you can see the image that you select from your device. This project will work nicely without selecting the image though. Below the display are two buttons, one for selecting images from your device and the other for collecting colors.
By clicking on the second button you can select any color in your display. You will easily get the color code of the selected color.
Color Picker using HTML CSS JavaScript
Now if you want to create this JavaScript Color Picker using HTML CSS and JavaScript then follow the below tutorial. Here you will find all codes and guides. First there is the html code, then the css code and finally the javascript code.
Step 1: HTML Code of Image Color Picker
The following codes are the HTML codes that are used to create the basic structure of this Image Color Picker.
First a small box is created in which all the information can be seen. After that display and buttons are created. You can directly copy the following HTML codes and use them for any purpose.
    <div class="wrapper">
      <div class="image-container">
        <img id="image" src="demo-image-3.jpg" />
      </div>
      <div class="btns-container">
        <input type="file" id="file" accesskey="image/*" />
        <label for="file">Open A Photo</label>
        <button id="pick-color">Pick Color</button>
      </div>
      <div id="error" class="hide"></div>
      <div id="result" class="hide">
        <div>
          <input type="text" id="hex-val-ref" />
          <button onclick="copy('hex-val-ref')">
            <i class="fa-regular fa-copy"></i>
          </button>
        </div>
        <div>
          <input type="text" id="rgb-val-ref" />
          <button onclick="copy('rgb-val-ref')">
            <i class="fa-regular fa-copy"></i>
          </button>
        </div>
        <div id="picked-color-ref"></div>
      </div>
      <div id="custom-alert">Color Code Copied!</div>
    </div>
Step 2: CSS Code of Image Color Picker
Now time to design this technology (Color Picker using JavaScript) a bit by css. You may not use it though. Because the design is completely your personal matter.
/* Reset default margin, padding, and box-sizing */
* {
  padding: 0;
  margin: 0;
  box-sizing: border-box;
  font-family: "Poppins", sans-serif; /* Set default font family */
}

/* Styling for the body */
body {
  background-color: #025bee; /* Set background color */
}

/* Wrapper styles */
.wrapper {
  background-color: #ffffff; /* Set background color */
  width: 90%; /* Set width */
  max-width: 31.25em; /* Set maximum width */
  position: absolute; /* Positioning */
  transform: translateX(-50%); /* Center horizontally */
  left: 50%;
  top: 0.5em;
  padding: 1.5em; /* Padding */
  border-radius: 0.8em; /* Border radius */
}

/* Image styles */
img {
  display: block; /* Make images block-level */
  width: 80%; /* Set width */
  margin: auto; /* Center horizontally */
}

/* Buttons container styles */
.btns-container {
  display: grid; /* Display as grid */
  grid-template-columns: 1fr 1fr; /* Two columns */
  gap: 1em; /* Gap between items */
  margin: 1em 0 1.5em 0; /* Margin */
}

/* Remove default styling for input, label, and button */
input,
label,
button {
  border: none;
  outline: none;
}

/* Styling for file input */
input[type="file"] {
  display: none; /* Hide file input */
}

/* Styling for labels and buttons */
label,
button {
  display: block; /* Display as block */
  font-size: 1.1em; /* Font size */
  background-color: #025bee; /* Background color */
  color: #ffffff; /* Text color */
  text-align: center; /* Text alignment */
  padding: 0.8em 0; /* Padding */
  border-radius: 0.3em; /* Border radius */
  cursor: pointer; /* Cursor style */
}

/* Styling for result section */
#result {
  grid-template-columns: 1fr 1fr; /* Two columns */
  grid-gap: 1em; /* Gap between items */
}

#result div {
  position: relative; /* Positioning */
  display: flex; /* Display as flex */
  align-items: center; /* Vertical alignment */
  justify-content: space-between; /* Space between items */
}

/* Styling for input fields */
#result input {
  background-color: transparent; /* Transparent background */
  font-size: 1em; /* Font size */
  padding: 0.5em; /* Padding */
  width: 100%; /* Full width */
  color: #313b4c; /* Text color */
  border-bottom: 0.1em solid #021637; /* Bottom border */
}

/* Styling for buttons inside result section */
#result button {
  position: absolute; /* Positioning */
  right: 0.6em; /* Right spacing */
  background-color: transparent; /* Transparent background */
  color: #7c8696; /* Text color */
}

/* Styling for picked color reference */
#picked-color-ref {
  grid-column: 2; /* Span across two columns */
  grid-row: 1 / 3; /* Span across two rows */
  border: 0.6em solid #d9e8ff; /* Border */
  border-radius: 0.5em; /* Border radius */
}

/* Custom alert styling */
#custom-alert {
  transform: scale(0); /* Initially hidden */
  transition: 0.5s; /* Transition effect */
  transform-origin: center; /* Transformation origin */
  background-color: #d9e8ff; /* Background color */
  color: #025bee; /* Text color */
  text-align: center; /* Text alignment */
  padding: 0.5em; /* Padding */
  margin-top: 1.5em; /* Top margin */
}

/* Hide class */
.hide {
  display: none; /* Hide element */
}

/* Error styling */
#error {
  color: #ff725a; /* Text color */
  text-align: center; /* Text alignment */
}
Step 3: Activate the Image Color Picker with JavaScript
Now it’s time to make this project fully functional using JavaScript. Here I have used some JavaScript which is easy to understand if you have some knowledge of JavaScript. Here I have commented every logic and line so that you don’t have any difficulty in understanding.
// Initial references to DOM elements
let pickColor = document.getElementById("pick-color");
let error = document.getElementById("error");
let fileInput = document.getElementById("file");
let image = document.getElementById("image");
let hexValRef = document.getElementById("hex-val-ref");
let rgbValRef = document.getElementById("rgb-val-ref");
let customAlert = document.getElementById("custom-alert");
let pickedColorRef = document.getElementById("picked-color-ref");
let eyeDropper;

// Function executed when the window loads
window.onload = () => {
  // Check if the browser supports the EyeDropper API
  if ("EyeDropper" in window) {
    // If supported, remove hide class from pickColor element
    pickColor.classList.remove("hide");
    // Create a new EyeDropper object
    eyeDropper = new EyeDropper();
  } else {
    // If not supported, display error message and hide pickColor element
    error.classList.remove("hide");
    error.innerText = "Your browser doesn't support Eyedropper API";
    pickColor.classList.add("hide");
    return false; // exit function
  }
};

// Function to handle color selection using EyeDropper
const colorSelector = async () => {
  const color = await eyeDropper
    .open()
    .then((colorValue) => {
      error.classList.add("hide"); // Hide error message if any
      // Get the hex color code
      let hexValue = colorValue.sRGBHex;
      // Convert Hex Value To RGB
      let rgbArr = [];
      for (let i = 1; i < hexValue.length; i += 2) {
        rgbArr.push(parseInt(hexValue[i] + hexValue[i + 1], 16));
        console.log(rgbArr);
      }
      let rgbValue = "rgb(" + rgbArr + ")";
      console.log(hexValue, rgbValue);
      // Display color information
      result.style.display = "grid";
      hexValRef.value = hexValue;
      rgbValRef.value = rgbValue;
      pickedColorRef.style.backgroundColor = hexValue;
    })
    .catch((err) => {
      error.classList.remove("hide"); // Show error message
      // If user closes the eyedropper using escape key
      if (err.toString().includes("AbortError")) {
        error.innerText = "";
      } else {
        error.innerText = err;
      }
    });
};

// Event listener for pickColor button click
pickColor.addEventListener("click", colorSelector);

// Allow user to choose image of their own choice
fileInput.onchange = () => {
  result.style.display = "none"; // Hide result
  let reader = new FileReader(); // Create a FileReader object
  reader.readAsDataURL(fileInput.files[0]); // Read the contents of the file
  reader.onload = () => {
    image.setAttribute("src", reader.result); // Set image src attribute
  };
};

// Function to copy the color code
let copy = (textId) => {
  document.getElementById(textId).select(); // Select the text in the input element
  document.execCommand("copy"); // Copy the selected text to clipboard
  // Display alert
  customAlert.style.transform = "scale(1)";
  setTimeout(() => {
    customAlert.style.transform = "scale(0)";
  }, 2000); // Hide alert after 2 seconds
};
Hope you have learned from this tutorial how I created this Image Color Picker using HTML CSS and JavaScript. If there is any problem then you can use the download button below.
If you want to add it to any of your projects, please let me know in the comments. Please comment on how you like this JavaScript Image Color Picker.